For Personal Premium and Business users only.
ADrive Desktop 2.2 allows you to unleash the full potential of ADrive's cloud storage.
- Map your ADrive account as a folder on your local computer.
- Backup files from your local computer for archiving on your ADrive account.
- Keep folders on multiple computers in Sync using your ADrive account.
Upgrading from a previous version? See the list of new features below.
Install ADrive Desktop
The first step is to download one of the following installers for your particular operating system:
| Windows: |
ADriveDesktop.exe ( Version: 2.2 MD5: b0796e21e3267341536931bb43e1faad ) |
| Mac OS X: |
ADriveDesktop.mpkg.zip ( Version: 2.2 MD5: 3afd8e1f26bd5fc2f09b2f25d316998a ) |
Once you have downloaded the installer for your computer run it and follow the instructions.
Windows 8 users: you may see a warning that ADriveDesktop.exe is an unrecognized app. From that warning dialog you will need to click "More info" which will switch the buttons and allow you to choose "Run anyway".
Main Window
When you first start up ADrive Desktop you will see the Main Window. This window is the control panel for the ADrive Desktop. From this window you can configure your account settings, map a Drive and setup Backup and Sync jobs.
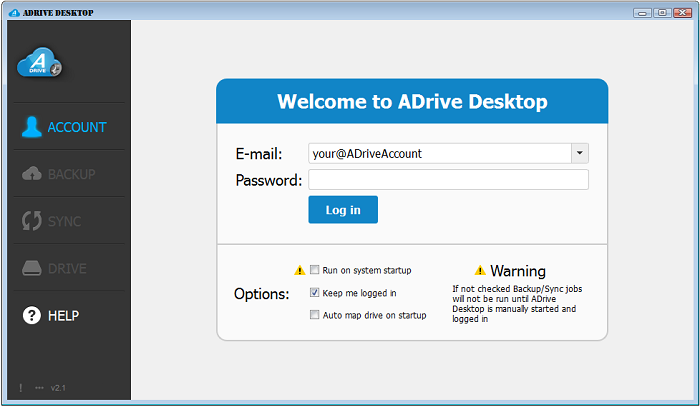
Account
The first time you run ADrive Desktop you will need to configure your account settings. Click on Account on the left navigation to show the Account screen. Enter the E-mail address you used for your ADrive account and the Password used for that account. You can then click the Log in button to connect to ADrive.
From the Account screen you can also configure several options to control how ADrive Desktop functions:
- Run on system startup: If checked the ADrive Desktop will automatically start when you log in to your computer. This is not required for scheduled Backup and Sync jobs, however, those jobs will not run unless ADrive Desktop is running.
- Keep me logged in: If checked the your e-mail and password will be saved and ADrive Desktop will automatically connect when the client is started. This is required for scheduled Backup and Sync jobs.
- Auto map drive on startup: If checked your ADrive account will automatically map to a Drive on your computer using the last settings.
Map a Drive
Once you have configured your account and logged in you will be able to map your ADrive account to a virtual Drive on your local computer. Mapping a Drive allows you to manage all of your ADrive files as if they were saved on your computer. You can upload or download files by dragging them to or from the mapped drive window. You can move, copy, rename or delete them as you would any other files on your computer.
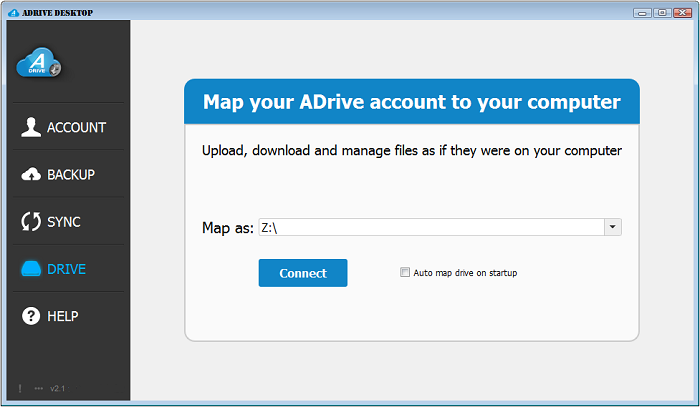
The settings for a mapped Drive is very easy to setup. The first step is to choose where to map your ADrive account on your computer. For Windows users you can pick which drive letter you would like to use. For Mac users you can choose any folder on your computer. Once you have chosen the location you can click the Map button. Once the Drive is mapped you can click the Open button to open the mapped Drive in your operating system's file browser.
Notes:
-
When uploading or downloading files there will be a delay as the data is transferred. Windows Explorer/Mac Finder may tell you the file has completed, but the file may still be uploading/downloading in the background. You can track the true progress of the transfer in the Progress Window.
Depending on your Show Automatically settings for the Progress Window you may or may not see it automatically. If it is not showing you can click right-click on the task bar icon and select Show Progress or click on the ... button in the lower left corner of the Main window. - Opening large files directly from the mapped drive can fail if the file hasn't finished downloading before the opening application times out. For large files it may help to download them to your computer and open them once they are done downloading.
- Deleting a file from the mapped Drive will permanently remove it from ADrive. The file is not moved to your computer's recycle bin/trash.
- ADrive Desktop has the same limits as our other tools: maximum size of a single file is 16GB and no more than 10,000 files in a single folder.
Backup
ADrive Desktop helps protect you from data loss by allowing you to create Backup jobs that upload files from a folder on your computer to your ADrive account on a regular basis. Backup jobs are an incremental backup which means that after the initial upload ADrive Desktop will only upload files where modification time or size has changed.
To ensure you never lose an important file Backup will never remove a file from ADrive! If a file is removed from a folder on your computer that has been backed up using ADrive Desktop it will remain on ADrive for recovery.
For example if you were backing up a local folder named "foo" to an ADrive Folder "/foo" then you will need to make sure to change the ADrive Folder on the new Backup job to "/foo" before running the new backup.
Managing Backup Jobs

The Backup Folders screen shows a list of currently configured jobs. You can select a job by clicking on it to view the ADrive folder the job is backing up to, the next backup time scheduled, view the history or open the edit job properties screen. You can also get to the edit job properties screen by double-clicking on the job. To remove a job you can click on the red X icon next to the job name.
From the Backup Folders you can also control the jobs. If you would like to manually run a job you can click Backup Now. If you would like to stop an in progress job you can click on the circle with a slash icon that replaces the red X icon. Please note that cancelling a job while it is in progress will stop the job immediately and any unfinished uploads will not be visible on ADrive.
Adding a new Backup job
To add a new Backup job you can click on the New Job button in the upper right corner. This will open a new window asking you to pick the folder you would like to Backup. On Windows you can also right-click on a folder in Windows Explorer and choose ADrive Desktop-> Backup Now
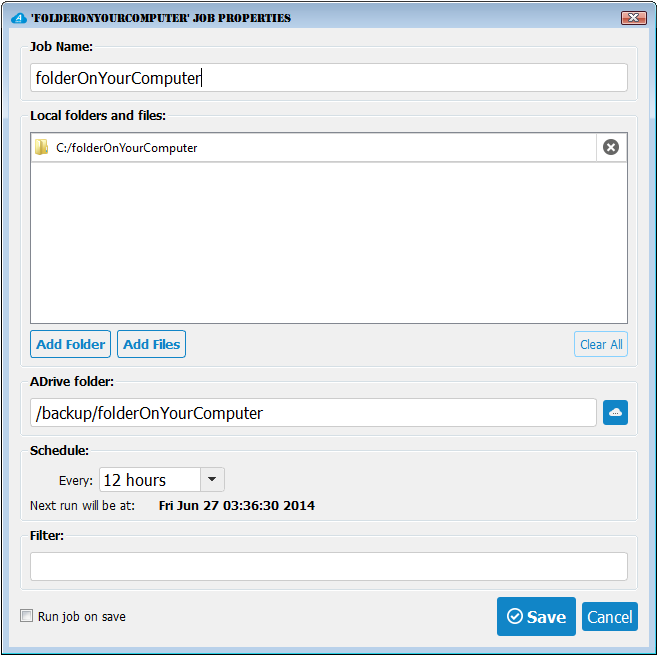
Once you have selected a folder the Job Properties dialog will appear to allow you to further configure the Backup job. This screen will automatically populate the required fields with default values. You can click Save if you are happy with the defaults or make changes and then save.
- Job Name: a unique name for this job.
-
Local folders and files: the list of local folders and files that will be backed up as part of this job. You can add additional folders and files by clicking on Add Folder or Add Files.
Note: If you have a single folder the contents will be written to the the ADrive folder. If you have multiple folders in a Backup job they will be written as sub-folders of the ADrive folder. Changing an existing job to include more folders may result in multiple copies of previously upload files.
- ADrive folder: the remote folder on ADrive where the files and folders will be backed up to.
-
Schedule:
For Backup the default schedule is every 12 hours. You can choose every 15 or 30 minutes, 1, 2 or 12 hours, every day at a certain time, once a week on a specific day and time or once a month on a specific day and time.
Note: When picking a scheduled time it is important to consider the job you are running. If the job is going to take a long time to run because there are a lot of files or very large file sizes, then pick a time that allows the first run to complete before the next run is started.
- Filter: wildcard patterns to exclude folders/files from the backup. See Filters below for more information.
- Run job on save: if checked it will run the job immediately when you save.
Sync
Using ADrive Desktop you can keep folders on your computer in Sync with your ADrive account. Sync allows you to create scheduled jobs that upload, download and remove folder contents in order to keep folders on your computer and your ADrive account identical. You configure multiple computers to use the same ADrive account and Sync folders automatically from one computer to another via ADrive.
Sync, unlike Backup, is a two-way process which means that files may be uploaded, downloaded or removed. If you add a file to the folder on your computer it will be uploaded to ADrive on the next run. If a file has been added to ADrive it will be downloaded to your computer on the next run. Depending on the mode selected, if a file has been removed from your local computer it will be removed from ADrive (remote) or if a file has been removed from ADrive (remote) it will be moved to your local recycle bin/trash.
Sync Modes
There are two modes for Sync jobs that affect how the deletion of files is handled. It is important that you understand the difference to prevent data loss.
- Basic mode: This mode is designed to minimize the chance for a user to accidentally delete files/folders permanently by never deleting from ADrive (remote). If a local copy of a file does not exist it will be downloaded from ADrive (remote). This mode will delete files from the local computer if they have been removed from ADrive (remote). To permanently remove a file you must delete it on ADrive (remote).
- Advanced mode: This mode will delete files from the local computer if they have been removed from ADrive (remote). In addition it will delete files from ADrive (remote) if they have been removed from the local computer. Depending on your settings these deletions will be done automatically and will cascade to other computers syncing the same folder.
Delete confirmation
By default both modes are configured to treat deletions as a conflict that requires user confirmation before the file is removed. Conflicts require user input and as a result will prevent the Sync job from running automatically when a conflict arises. If you trust that you will not accidentally delete files you can change the settings on the Sync Job Properties screen to not require confirmation for deletes.
ADriveSync Folder
To make it easy to get started with Sync, ADrive Desktop provides a pre-configured Advanced Mode Sync job that syncs the contents of an ADriveSync folder. During installation the ADriveSync folder will be created in your "user" folder on the local computer. You can start copying files into the folder and they will be synced to ADrive and any other computers configured with the same ADrive account. If you prefer to not use this job you can delete the Sync job from the Sync Folders screen.
Managing Sync Jobs

The Sync Folders screen shows a list of currently configured jobs. You can select a job by clicking on it to view the ADrive folder the job is syncing to, the next sync time scheduled, view the history or open the edit job properties screen. You can also get to the edit job properties screen by double-clicking on the job. To remove a job you can click on the red X icon next to the job name.
From the Sync Folders you can also control the jobs. If you would like to manually run a job you can click Sync Now. If you would like to stop an in progress job you can click on the circle with a slash icon that replaces the red X icon. Please note that cancelling a job while it is in progress will stop the job immediately and any unfinished uploads/downloads will not be completed.
Adding a new Sync job
To add a new Sync job you can click on the New Job button in the upper right corner. This will open a new window asking you to pick the folder you would like to Sync. On Windows you can also right-click on a folder in Windows Explorer and choose ADrive Desktop -> Sync Now
Once you have selected a folder the Job Properties dialog will appear to allow you to further configure the Sync job. This screen will automatically populate the required fields with default values. You can click Save if you are happy with the defaults or make changes and then save.
- Job Name: a unique name for this job.
- Local folder: the local folder to Sync. Sync only allows a single folder per job.
- Mode: See the Sync Modes section above for details.
- Confirm the following actions: See the Delete Confirmation section above for details.
- ADrive folder: the remote folder on ADrive where the files and folders will be synced to.
-
Schedule:
For Sync the default schedule is every 15 minutes. You can choose every 15 or 30 minutes, 1, 2 or 12 hours, every day at a certain time, once a week on a specific day and time or once a month on a specific day and time.
Note: When picking a scheduled time it is important to consider the job you are running. If the job is going to take a long time to run because there are a lot of files or very large file sizes, then pick a time that allows the first run to complete before the next run is started.
- Filter: wildcard patterns to exclude folders/files from the job. See Filters below for more information.
- Run job on save: if checked it will run the job immediately when you save.
Sync Conflicts
Because Sync is a two-way process conflicts can arise where ADrive Desktop does not know how to resolve changes and it will require you to choose the proper action to take. A conflict can occur when a file has been modified by both sides since the last run or delete confirmation is turned on and a file needs to be deleted. When a conflict is found the job will be stopped and a dialog will appear showing the conflicts. The job will NOT continue until all conflicts are resolved or skipped.

To resolve a conflict you need to select it by clicking on the checkbox next to it and choose from one of the actions in the lower left corner. The actions use the following logic:
| Modified on both sides | Local file deleted | Remote file deleted | |
|---|---|---|---|
| Use local: | upload the local file and overwrite the ADrive (remote) changes. | permanently delete the file from ADrive (remote). | upload the local file. |
| Use remote: | download the ADrive (remote) file after moving the local file to recycle bin/trash. | download the ADrive (remote) file. | delete the local file by moving it to the recycle bin/trash. |
| Use remote (keep local): |
download the ADrive (remote) file after renaming the local file to filename.local.ext. | download the ADrive (remote) file. | delete the local file by moving it to the recycle bin/trash. |
| Skip: | do nothing for the file. This will cause a conflict again on the next run. | ||
Once you have resolved all the conflicts ( all files with ! in the Operation column ) you can click on Ok button to complete the job.
Filters
Filters for Backup and Sync jobs allow you to exclude folders/files from being backed up when their containing folder is part of a Backup job. The filter field in the Job Properties screen accepts a semi-colon (;) separated list of patterns to match a file path exactly. You can use an asterisk as a wildcard in the pattern.
For example if you wanted to exclude any jpg image files you could use the pattern: *.jpg. If you wanted to exclude a folder named foo you could use the pattern: */foo. You can do both like: *.jpg;*/foo.
Progress Window
When files are uploading or downloading the progress of the transfer will be displayed in the Progress Window. The top of the window shows the number and total progress of active downloads and uploads. The middle section shows the details of the individual files actively transferring or pending to be transferred.
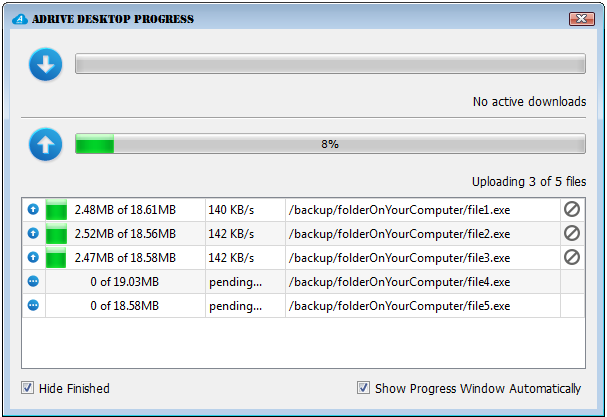
If you prefer not to see the Progress Window you can uncheck Show Progress Window Automatically to prevent it from automatically opening. If you want to see it in the future you can right-click on the task bar icon and select Show Progress or click on the ... button on the main window.
If you would also like to see the files that have completed as part of a Backup/Sync job you can uncheck Hide Finished.
Error Log Window
For various reasons during the use of ADrive Desktop errors may occur. When they do they will be logged to the Error Log and displayed on the Error Log Window.
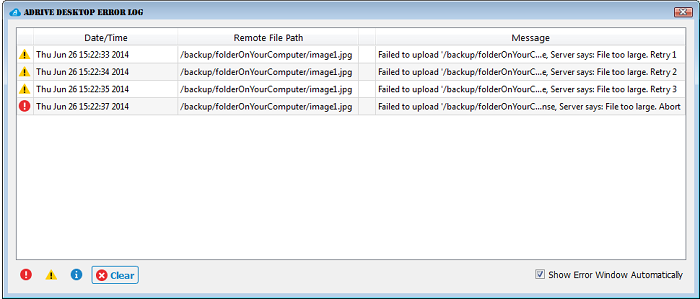
The Error Log Window will show you the most recent errors at the bottom of the list. You can clear the errors by clicking on the Clear button. If you prefer to not see the errors automatically you can uncheck Show Error Window Automatically and it will stay hidden. You can show it at anytime by clicking on the task bar icon and selecting Show Errors or clicking on the ! button on the main window.
Auto Update
From time to time ADrive will release new versions of the ADrive Desktop. The software will check regularly for new updates. If a new update is available you will be prompted to install the new version. It is highly recommended that you always install new updates. No data will be lost during updates.
New Features in 2.2
- Improved performance for drive mapping
- Improved stability for backup and sync jobs
- Improved support for Microsoft Office Files
New features in 2.1
- Basic/Advanced mode Sync
- Advanced mode ADriveSync folder and job
- Allow multiple files/folders in a single backup job
- File filters for Backup/Sync
- Improved performance for large backups
- Improved User Interface
Further Questions
If you have further questions please contact support@adrive.com.